
:: Thanks ::
Before start the tutorials, kne la downlod template nih.. ::click here::
n klik kt PDF template (mcm kt bawah)

STEP 1
In Photoshop, go to File > Open, and navigate to the location of WL-OL1200.pdf. Even though it’s a PDF instead of Photoshop document PSD file, Photoshop reads and writes to PDF. If you don’t see the PDF in your Open dialog, make sure the Files of Type dropdown menu is set to All Formats. Click on WL-OL1200.pdf and then the Open button.
STEP 2
Up will pop the Import PDF dialog box displaying a thumbnail of the template as well as various options. As this dialog implies, Photoshop can open any single page from multi-page PDFs—just choose the appropriate page thumbnail. In the case of label templates, though, there should be only a single page.
On the right of the Import PDF dialog are various options crucial to the success or failure of this template for its intended use (see Figure 3).
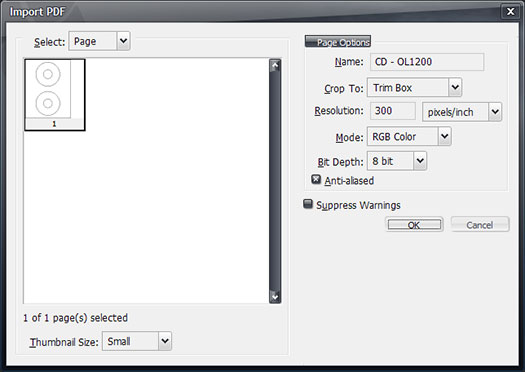 |
| Figure 3: The Import PDF dialog showing correct settings for this project. |
Name: A nice little touch, Photoshop let’s you name your document even before you’ve saved it. So let’s name ours Re-usable DVD Template.
Crop To: How should Photoshop crop the imported image? In our case we want to crop to the Trim Box, which should be 8.5x11-inches, so that we import the entire page uncropped. Depending on the label template itself, there may be no difference between the options here, but if there is a difference, it’s crucial to import the entire page, including margins, via the Trim Box choice. The digital template must align perfectly to pre-cut, self-adhesive labels; any variation and the image won’t align, and your entire label design will be for naught.
Resolution: This is the quality of the resulting template both onscreen and in print, and it may default to 72 ppi (pixels/inch)—extremely low-resolution screen resolution. We definitely do not want that. If you know in advance the resolution of your printer, enter that here (e.g. 300 ppi). If you intend to print these labels solely on desktop or networked inkjet or laser printers, 600 ppi is a good setting.
Mode: Leave this set to RGB Color. While it’s true printing presses and the vast majority of inkjet and laser printers are CMYK (Cyan, Magenta, Yellow, and Black), RGB has thousands more color hues, shades, and tones than CMYK. Don’t limit yourself during creation. You can always convert from RGB to CMYK after design time—with much better results than doing it now—or even leave it in RGB all the way through print; most printers can do the color conversion as part of the output process.
Bit Depth: This is the level of color. 16-bit color is the range of colors a film camera captures, which is actually larger than the range of color the human eye can perceive at any one time. Moreover, 16-bit images are massive in terms of both file size on disk and in RAM, and they will slow your Photoshop work unnecessarily. Let’s stick with 8-bit bit depth—16 million colors should be sufficient for a label design.
Anti-Aliased: (Checkbox) Should Photoshop smooth the edges of vector paths that are being rasterized? Yes, leave this checked.
Suppress Warnings: (Checkbox) Photoshop is cautious—at times cautious to the point of annoyance. This checkbox suppresses it’s cautionary alerts and hand-holding, although, in this case, there shouldn’t be any warnings.
Click OK. When the Re-usable DVD Template opens, it will show the two CD/DVD labels including outer diameter and the hole to be punched out of them. The checkerboard background indicates transparency — there isn’t a white background on this page.
STEP 3
The first thing we need to do is protect the template layer itself from accidental changes. On the Layers palette (Window > Layers), right-click on the only layer in the list, Layer 1, and choose Layer Properties from the top of the context sensitive popup menu. Name it Trim and hit OK. Now lock the layer by clicking the padlock icon immediately above the layer list (see Figure 4). Locking the layer prevents accidental repositioning (a disaster) as well as accidentally painting on the Trim layer itself. We’re not going to allow this layer to print, you see, otherwise we’d get horrible black lines on our printed labels.
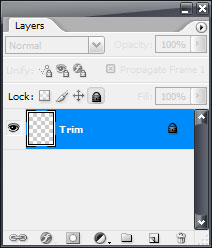 |
| Figure 4: The Layers palette so far, with the Trim layer locked. |
STEP 4
At the bottom of the Layers palette, click on the Create New Layer button to make a new layer above Trim. Double-click on the name Layer 1 to rename it inline to Artwork. This is where we’ll put the graphics for our label.
STEP 5
If we just started drawing, painting, and placing graphics on this layer as is, we’d quickly obscure the Trim layer and lose track of the edges of the label. So, click on and drag the Artwork layer in the Layers palette, and drop it below Trim. Now the edges will always be visible as we work.
STEP 6
With the Artwork layer selected in the Layers palette, grab the Type Tool from the Tools palette. Choose where you’d like to place the disk title, then click and drag out a rectangular area to define the space available to the title and an optional subtitle (see Figure 5). When you release the mouse, an I-beam cursor will be flashing in the text frame, ready for typing.
Enter a placeholder title of DISK TITLE, return, and Disk Subtitle. In addition to a text frame, you also have a new layer—DISK TITLE Disk Subtitle. When entering text, Photoshop creates a new special kind of layer called a Type layer. This is how your type remains editable at all times. Moreover, the layer name is a reflection of its content; change the text and the layer name will update to match.
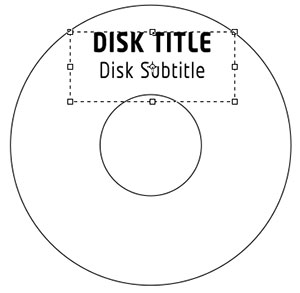 |
| Figure 5: Placeholder or FPO type in the title text frame (transform controls and a non-transparent background added for clarity). |
STEP 7
Repeat step 6 to create a second frame for other textual content that may be required for your label — things like the copyright and trademark notices, sales contact information, disk contents, and so on.
You now have the basics of your CD/DVD label template. Style the title and additional information FPO type, and, on the Artwork or additional layers, place or draw imagery like your company logo, background images, and decorative graphics. Figure 6 shows what a CD/DVD template for my REV Creative Drink brand might look like. Of course, you’ll want to use your own imagery, typefaces, and colors.
Although we would like to think that every print will align perfectly with the pre-scored paper labels, rarely is that the case. Printers vary in how they handle paper, digital images shift a little, and a hundred other things can happen that move images a fraction of an inch this way or that when it hits the paper. Prepare for this by accounting for possible shifts as you design. Try to keep text and crucial imagery at 1/8th of inch inside from the edge of a label, and extend any background images or colors approximately 1/8th outside the outer borders of a label.
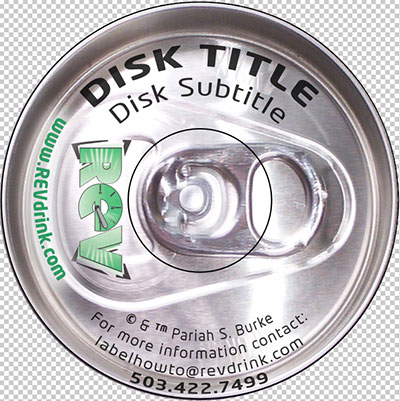 |
| Figure 6: The final design of my label template. Note: Even warped, the text is still live and fully editable. |
Once your design is finalized, it’s time to duplicate it across all the labels on the sheet. Photoshop makes that easy.
STEP 1
In the Layers palette, select all layers except Trim. To select sequential layers, click on the first and then, while holding the SHIFT key, click on the last layer. Hold CMD (CTRL on Windows) while clicking to select or deselect layers non-sequentially.
STEP 2
From the flyout menu in the top-right corner of the Layers palette choose New Group from Layers. Up will pop the New Group from Layers dialog asking a few questions. Name the group Upper Label. Optionally set a color for the group, and leave Mode and Opacity at their defaults — Pass Through and 100%, respectively. Click OK, and all selected layers will be collected in a new layer group.
STEP 3
Among other things, layer groups allow you to manipulate several layers at once. With the Upper Label group still selected on the Layers palette, return to that palette’s fly out menu and choose Duplicate Group. Name this one Lower Label and click OK.
STEP 4
With the Lower Label group selected on the Layers palette, switch to the Move Tool by press V on your keyboard. On the Options bar at the top of the screen, check Auto Select Groups (see Figure 7 below).
| Figure 7: The Auto Select Groups checkbox on Photoshop’s Options bar. |
STEP 5
Using the Move Tool, click on the label artwork itself and drag downward while holding the SHIFT key to constrain the motion to a straight line (90-degress in this case). Because you selected a layer group instead of a single layer, all the components of this complete label will move simultaneously. Align the design to the bottom CD/DVD donut. If you can’t get it exact, use the arrow keys on your keyboard for fine tuning.
STEP 6
Lastly — and this is important — hide the Trim layer by clicking the eyeball icon beside on the Layers palette. Failing to hide it now means you or someone could inadvertently include it in the print output, resulting in the possibility that those lines would appear on your labels themselves. Yuck!
If your project is not CD/DVD labels but something like address or diskette labels that are more numerous than just two on a page, run through steps 3-5 above for each additional label.
Working With The Template
Now your label template is ready to be saved and distributed to all the other offices. Of course, the fonts you used will need to be installed on any computer that might open and edit the Photoshop document. In a corporate environment where everyone involved in creative and marketing tasks should already have the company signature fonts, or if you used standard operating system fonts like Times New Roman, Courier, Arial (Windows), or Helvetica (Mac), that shouldn’t be an impediment.
Anytime you or anyone else needs to generate new CD/DVD project labels, open the template you just created, save a copy (File > Save As), and edit the appropriate type layers in the Upper Label and Lower Label groups — but that’s only if you have a simple template with no more than two labels per sheet. If you have a sheet with more than two, I recommend you don’t directly edit the type layers to avoid accidental mistakes. Instead, take advantage of another little-known and under appreciated Photoshop feature: Find and Replace Text (see Figure 8 below).
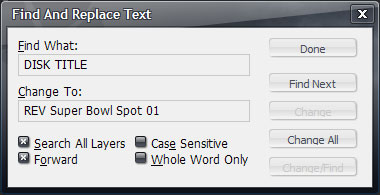 |
| Figure 8: Photoshop’s Find and Replace Text dialog. |
If you make a mistake with Find and Replace Text, undo with CMD+Z / CTRL+Z, or run another round of Find and Replace Text.
If you’re printing your own labels on an inkjet or laser printer, just print directly from Photoshop via File > Print. However, if you’re sending it out to a print shop, it’s invariably better to send a PDF even if for no other reason than a PDF embeds the fonts so they don’t have to be sent with the artwork.
To create a PDF from Photoshop, simply go to File > Save As. In the Save dialog, change the Format dropdown list from Photoshop (*.PSD; *.PDD) to Photoshop PDF (*.PDF; *.PDP).
Tutorial ni aku amik from :: sini ::
thanks a lot.. i just copy and paste.. this is for my assignment, using photoshop..n i want to share with others.. =)
ReplyDeletenice post darling :)
ReplyDelete